How I Use APOB AI to Build an Ecommerce Creative Pack
Learn how to turn one approved AI source frame into a consistent ecommerce creative pack across Amazon, Shopify, social media, email, and creator-style ads.
An ecommerce product does not need one image. It needs a family of assets: a clean listing visual, a lifestyle scene, a social crop, a creator-led ad concept, and enough variations to keep a campaign from looking stale. For a small seller or freelancer, the expensive part is not producing a single attractive picture. It is maintaining visual consistency while adapting the same product story to Amazon, Shopify, Instagram, TikTok, email, and paid ads.
I tested a practical way to solve that problem with APOB AI. The goal was to create an approved “source frame” that could anchor a larger creative pack. Instead of generating random lifestyle images, I used one community portrait model, one fictional product, one controlled color palette, and a prompt that defined the commercial purpose of the scene.
This workflow is useful for store owners, marketplace operators, content freelancers, and small agencies. It does not replace real product photography when exact packaging or regulated claims matter. It does, however, make concept development, seasonal variations, creator-style visuals, and campaign planning much faster.
Start with a creative brief, not a prompt
Before opening an AI tool, I wrote a one-minute brief for the asset:
- Product: an unbranded matte-white skincare bottle
- Audience: design-conscious shoppers who respond to clean, trustworthy visuals
- Channel: a 16:9 hero image that can also guide social and ad variants
- Visual language: beige and sage, natural window light, realistic editorial photography
- Business purpose: show both the product and the person behind the brand
- Restrictions: no logo, no readable packaging text, no watermark, and no medical claims
This step prevents a common mistake: asking for “a beautiful ecommerce image” and hoping the model guesses the product hierarchy, channel, and visual identity. A usable brief should tell the generator what must stay constant and what can change later.
For a real client, I would also collect approved brand colors, product dimensions, mandatory disclaimers, reference images, and a short list of forbidden claims. Those details become a quality checklist after generation.
Step 1: Choose a reusable character
I selected the community portrait model “Soo Hee Tan 2.” A portrait model gives the campaign a repeatable human presence, which is valuable when a brand wants the same founder, ambassador, or virtual creator across multiple assets.
The character should support the product rather than compete with it. For this test, I wanted a polished but approachable founder look. I avoided a fashion-heavy prompt because the subject of the image was the product-and-founder relationship, not the outfit.
If the campaign will be published commercially, confirm that the selected model and all source assets can be used for the intended purpose. For a real spokesperson or employee, obtain permission before creating a trained portrait model.
Step 2: Set the generation controls
I used the following settings:
- Mode: Generate image
- Portrait model: Soo Hee Tan 2
- Quality: Ultra 2K
- Aspect ratio: 16:9
- Output count: 1 image
Generating one image first is deliberate. A large batch can multiply a weak creative direction. One controlled draft is cheaper to review, faster to correct, and easier to compare against the brief. Once the direction is approved, the same prompt structure can be reused for vertical, square, and marketplace-ready variations.
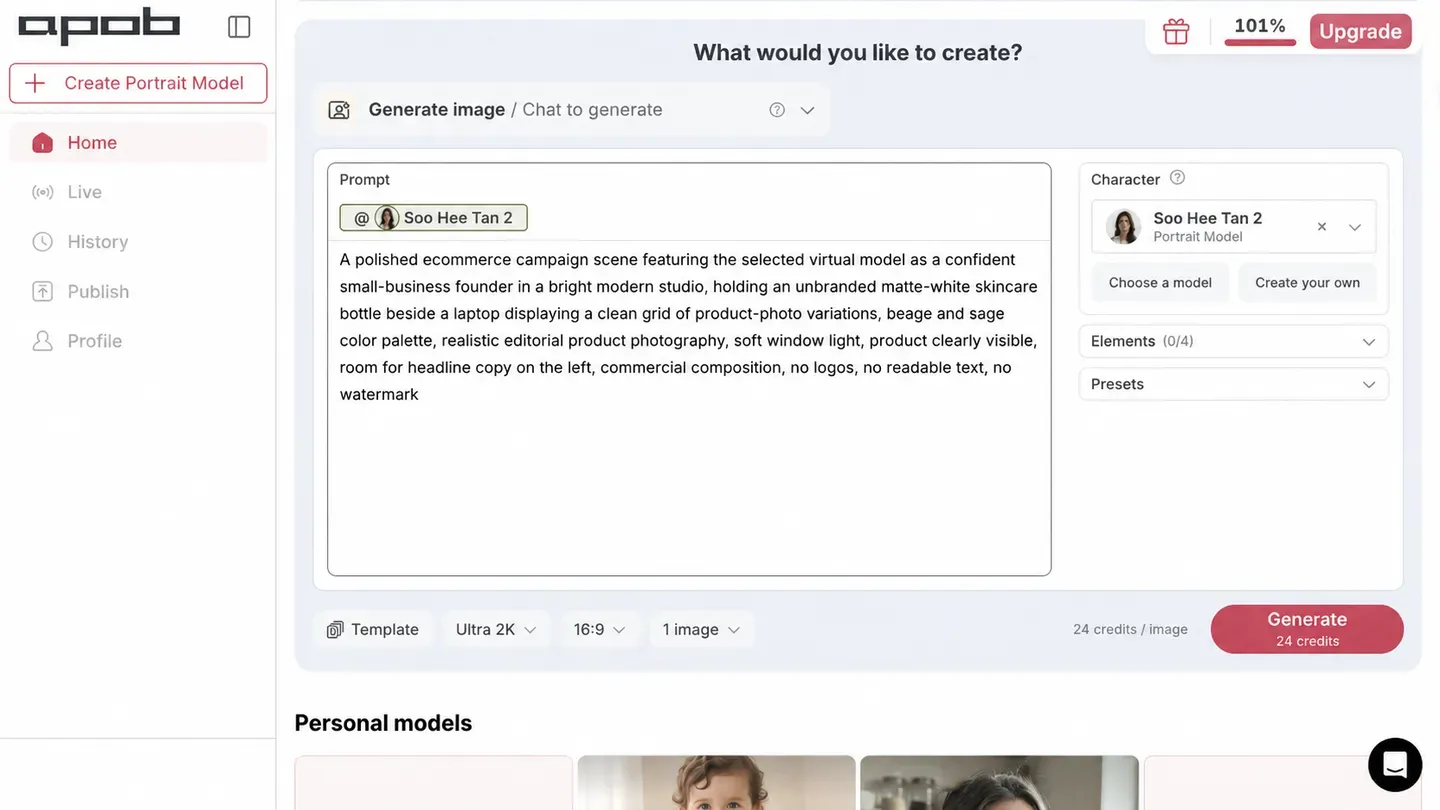
Figure 1. APOB AI setup used for the ecommerce test: community model, Ultra 2K quality, 16:9 ratio, one output, and the complete prompt.
Step 3: Use a prompt with commercial constraints
Here is the exact prompt used in the test:
A polished ecommerce campaign scene featuring the selected virtual model as a confident small-business founder in a bright modern studio, holding an unbranded matte-white skincare bottle beside a laptop displaying a clean grid of product-photo variations, beige and sage color palette, realistic editorial product photography, soft window light, product clearly visible, room for headline copy on the left, commercial composition, no logos, no readable text, no watermark.
The prompt has five useful layers:
- Role and context: “small-business founder” makes the person feel connected to the product.
- Product action: “holding an unbranded matte-white skincare bottle” gives the model a concrete interaction.
- Campaign system: the laptop with product variations suggests a repeatable content workflow.
- Art direction: the palette, lighting, and editorial style keep the scene coherent.
- Production constraints: negative space, no logos, no readable text, and no watermark protect the layout from avoidable problems.
This structure is more reliable than a long list of adjectives. It tells the system what the image is for, what the viewer should notice, and where future design elements may go.
Step 4: Inspect the first result like an ecommerce editor
The generated image placed the product in the model’s hand, repeated the same visual language on the laptop, and preserved a clean studio palette. That made it a useful source frame rather than an isolated portrait.
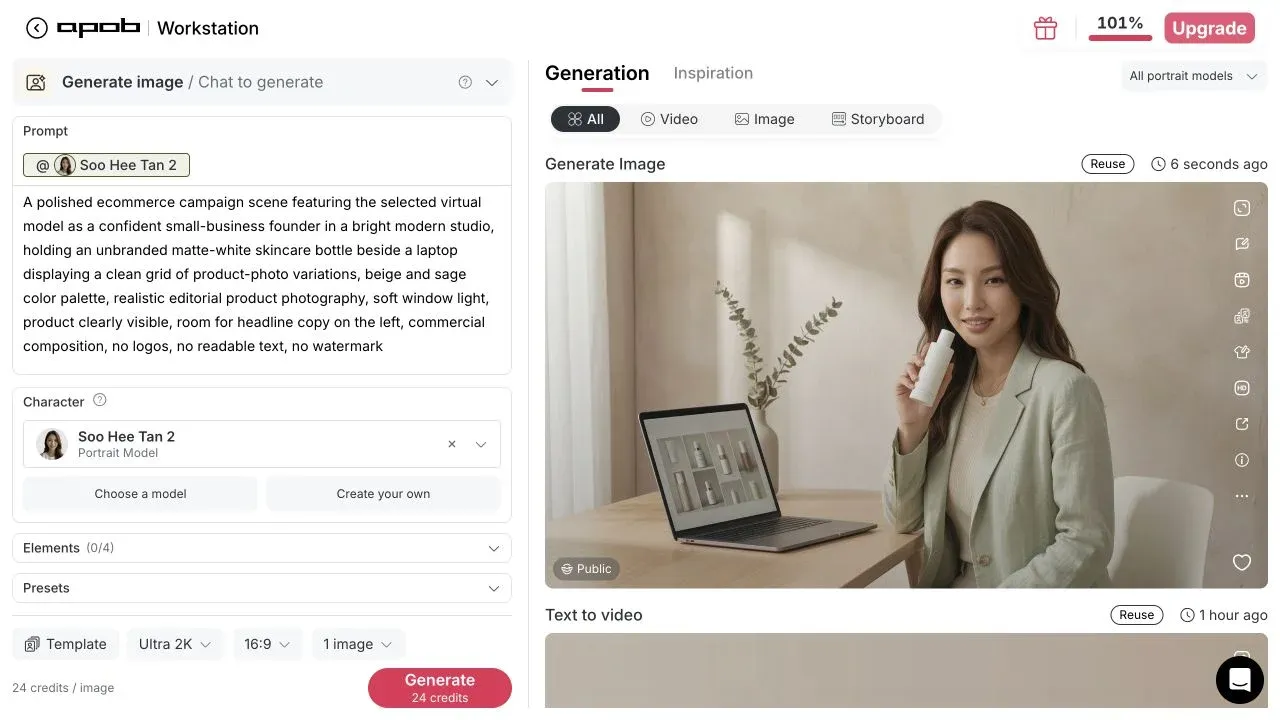
Figure 2. The generated result in APOB AI. The product remains visible, the palette is consistent, and the laptop reinforces the idea of a multi-asset campaign.
My review checklist was simple:
- Is the product easy to identify at thumbnail size?
- Do the hands, bottle, laptop, and background look plausible?
- Is there enough empty space for a headline or promotion?
- Does the image avoid fake labels, distorted text, or unsupported product claims?
- Could the same character, palette, and product position be repeated in another ratio?
The answer was strong enough for concept use, but a real campaign would still require a packaging-accuracy pass. If the product label must be exact, use an approved packshot as a product element or composite the verified label during editing. Generative output should never invent ingredients, certifications, or performance promises.
Step 5: Turn one source frame into a channel-ready pack
After the source frame is approved, I would build variants in a controlled order:
- Shopify hero: retain the 16:9 composition and add a short benefit-led headline in the negative space.
- Instagram feed: create a 1:1 crop with the product and face inside the safe area.
- Story or TikTok cover: generate a 9:16 version with extra space above and below the subject.
- Marketplace secondary image: reduce the lifestyle styling and make product scale and use context clearer.
- Email banner: simplify the background so a call-to-action remains readable on mobile.
An AI image generator is most useful here when it is treated as a production system rather than a slot machine. Keep the approved character, product description, palette, lighting, and lens language fixed. Change only one variable at a time—such as channel ratio, camera distance, background, or offer context—so the final set still feels like one campaign.
Step 6: Prepare the image for a creator-style ad
The approved image can also become the planning frame for a short ad. I did not render a video for this test; the process stopped at the pre-production stage. That makes it possible to validate the visual direction before spending time or credits on motion.
For an ad, I would use this simple six-scene outline:
- Hook: the founder holds the bottle and addresses a common customer frustration.
- Problem: a close-up shows the clutter of inconsistent product content.
- Solution: the founder introduces a simpler visual workflow.
- Proof: quick cuts show the same product adapted to different channels.
- Offer: the product and value proposition appear together.
- CTA: the final frame leaves clear space for the store URL or promotion.
Suggested motion prompt:
Subtle natural presenter movement, gentle camera push-in, founder raises the skincare bottle slightly toward the camera, soft studio light remains stable, laptop product grid stays unchanged, realistic hand motion, no new text, no logo changes, no product deformation.
An AI ad video generator can then turn an approved product image or concept into a UGC-style campaign draft. The important step is approval before animation: lock the bottle, label treatment, wardrobe, background, and claim language first. Motion should extend a verified image, not hide an unresolved problem.
A practical freelance offer built around this workflow
This process can be packaged as a small, sellable service. A freelancer could offer one campaign concept, three approved source frames, five channel crops, two headline directions, and one short-form storyboard. The value is not “AI images.” The value is a coherent mini-campaign that a seller can actually publish.
To protect margins, set clear boundaries: one product, one character, one visual direction, two revision rounds, and a defined list of deliverables. Charge separately for exact packaging compositing, additional products, trained private models, or rendered video.
Final takeaway
The fastest ecommerce workflow is not the one that generates the most pictures. It is the one that reaches an approved visual system with the fewest uncontrolled variables. Start with a brief, generate one source frame, inspect it against product truth, and then adapt it methodically. That is how a single AI-assisted image becomes a useful creative pack instead of another disposable draft.